A Handmade Gift for a Darling Person : Crocheted Coloured Garland

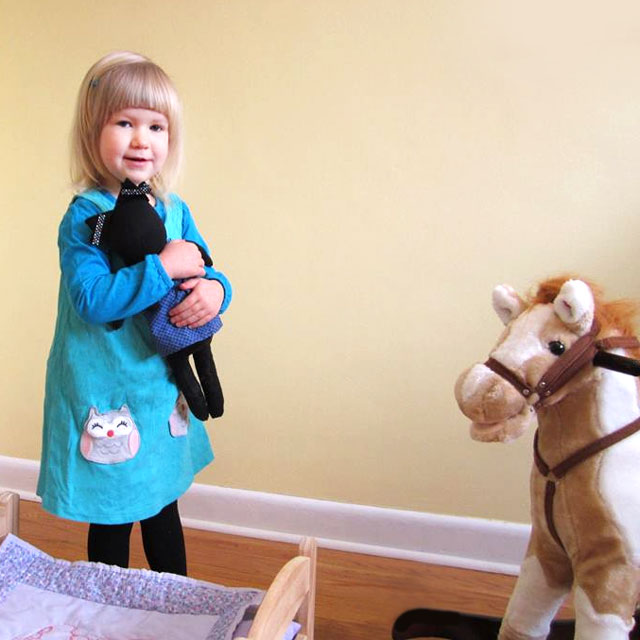
Every year about this time I write a post that features pictures of a sweet little girl, along with the gift I made her the previous Christmas. Her name is Delilah and she is my cousin Lisa’s child. We live a plane ride away so don’t get the chance to see one another, so the photos my cousin sends of Delilah enjoying her presents are very close to my heart. Lisa and her husband have kindly given me permission to share the pictures with you.
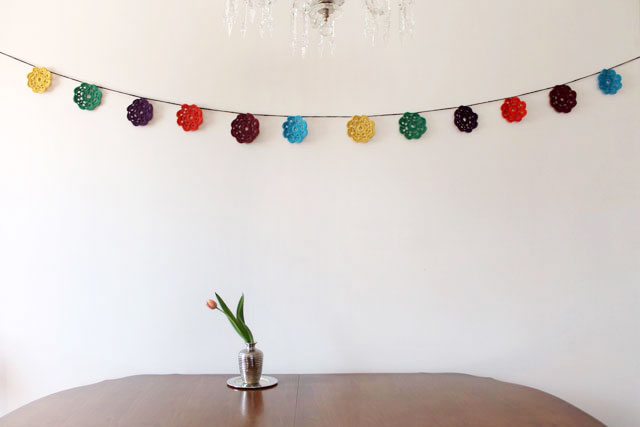
Delilah is now 5. This year I made her a colourful crocheted garland to decorate her room.

↑ Christmas morning. ↑


If you’d like to see her with her handmade gifts from previous years, here they are :
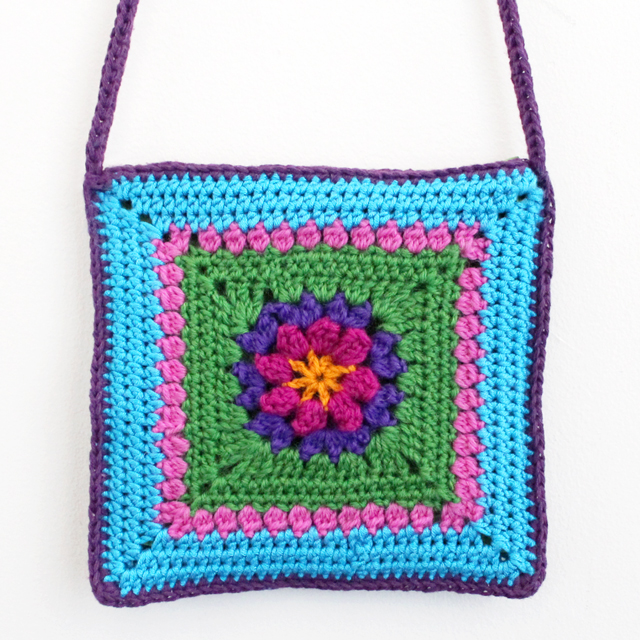
– A crocheted purse when she was four.
– A cat doll made from a sock and clothing to fit when she was three, (seen in a few of the photos above).
– A cotton quilted blanket when she was two.
For the crocheters out there who would also like to make a garland like Delilah’s, the pattern is below.
For everyone else, thanks for visiting my site.
xo loulou
How to Make a Crocheted Garland with Colourful Triangles, Octagons, Flowers and Squares

Make 2 each of the triangle, flower and square and 3 octagons, in colours of your choice. I used cotton yarn for this, creating stiff motifs that hold their shape.


How to Crochet the Triangle:
1st row – Chain 4 and slip stitch into first chain to form a ring.
2nd row – Chain 2, 2 double-crochet stitches into ring (to make first of 3 clusters), Chain 3 and 3 dc into ring (to make second cluster), Chain 3 and 3 dc into ring (third cluster). Chain 3 and slip stitch into top of first chain, to close the circle. You’ll have 3 clusters of 3 stitches, with 3 chain spaces between each.
3rd row – Slip stitch into top of first 2 stitches in previous row, to move you over to the “chain 3 space”. Chain 2, 2 dc into first space (first cluster of 3), followed by chain 3 and 3 dc into same space (second cluster of 3). Chain 2 (note, that is 2) “3 dc, ch 3 (note, that is 3), 3 dc” into next space. Repeat for third space. So, in each “chain 3” space in the previous row, you will have two clusters separated by chains of 3. Chain 2 and slip stitch into top of first chain, to close the circle.
4th row – Slip stitch into top of first 2 stitches in previous row, to move you over to the “chain 3 space” (which is a corner of the triangle). Chain 2, 2 dc into first space, followed by chain 3, 3 dc, chain 2. (You’re now on the side of the triangle). 3 half-double crochets into hole (the ch 2 hole from previous row. Note the stitch is a half-double-crochet). Chain 2. (Now you’re at the second corner.) 3 dc (back to double crochets), chain 3, 3 dc into corner hole. Chain 2. (you’re now on the second side.) 3 half-double crochets into hole. Chain 2. (Now you’re at the third corner.) 3 dc, chain 3, 3 dc into corner hole. Chain 2. (You’re now on the third side.) 3 half-double crochets into hole. Chain 2 and slip stitch into top of beginning chain to finish.
5th row – Chain 2. Now you’re going to do a “half-double-crochet” border all the way around — 2 hdc into the top of the “cluster of 3 stitches” and 2 hdc in each side hole, and “3 hdc, chain 3, 3 hdc” in each corner. Slip stitch to finish. Each side of triangle will have 16 hdc stitches, plus each corner will have 3 chains. The sides will be about 3 1/2 inches long.
How to Crochet the Square:
1st row – Chain 6 and slip stitch into first chain to form a loop.
2nd row – Chain 3, 2 dc into middle hole (to form 1st of four clusters), chain 3, * 3 dc into middle hole (second cluster), chain 3 *. Repeat between * to form four clusters, ending with chain 3. Slip stitch to top of first chain 3, to close the circle.
3rd row – slip stitch over to the first hole (made by the chain 3s) in previous row. Chain 3, 2 dc into hole, followed by Chain 2, 3 dc into same hole (so you have 2 clusters of 3 stitches in that hole, which have formed your first corner). * Chain 1 (side of square), 3 dc, chain 3, 3 dc (second corner).* Repeat between * to make four corners, ending with chain 1. Slip stitch into top of first chain to finish the row.
4th row – slip stitch over to the first hole in previous row. Chain 3, 2 dc into hole, followed by chain 2 (that’s the corner), 3 dc into same hole (so, in each corner you’ll have 2 clusters of 3 stitches, divided by a chain 2). To form 1st side, chain 1, 3 dc into hole, chain 1. You’re now at your second corner – 3 dc, chain 2, 3 dc into hole. To form 2nd side, chain 1, 3 dc into hole, chain 1. You’re now at your third corner. Continue pattern to create the square and close row with a slip stitch.
5th row – single crochet in each stitch in previous row, over to the corner where you’ll do “2sc, chain 1, 2sc” into the corner holes of previous row. Continue all around square and slip stitch to finish row.
6th row – repeat previous row. Finished square should measure about 3 1/2 inches across.
How to Crochet the Octagon :
1st row – Chain 6 and slip stitch into first chain to form a loop.
2nd row – Chain 3. Make 23 double-crochets into the middle circle and slip stitch at top of beginning chain 3 to close the circle.
3rd row – Chain 4 and make 1 dc into base of chain (to create your 1st “vee”). *Chain 1. Skip 2 stitches and make “1 dc, chain 2, 1 dc” into next stitch*. Repeat between *s and slip stitch into second stitch of beginning chain 4, to close circle. You should have 8 “vees”.
4th row – Chain 3. In first chain 2 space of previous row (within the first “vee”), make 1 dc, chain 2, and 2 dc. *Into the next “chain 1” from previous row, make 1 dc. Into the next “vee”, 2 dc, chain 2, 2dc.* Repeat between *s to finish row, ending with 1dc in last of 8 “chain 1” spaces. Slip stitch into top of beginning chain 3.
5th row – slip stitch over to first “chain 2 space”. Chain 2 and 1 hdc, ch 2, 2 hdc, into “that chain 2 space” (you’ve made the first corner). * Along the first side do 1 hdc into each stitch (4 hdcs per side). Make your second corner with “2 hdc, ch 2, 2 hdc”. Continue from until you’ve made 8 corners. Slip stitch into first Chain 2 to close. The finished octagon should be about 3 1/2 inches across.
The flower motif is made by following this pattern for the Maybelle Flower. A few years ago I made a whole garland using this flower, as seen in this post.
To make the garland :
If you’ve used cotton yarn, lightly press your shapes with a steam iron.
Make 6 chain stitches (which will later be made into a loop for hanging the garland) and then make 60 chain stitches.
Attach triangle with slip stitches along one edge (18 stitches).
Chain 10 between the triangle and octagon.
Attach octagon with slip stitches across one edge (9 stitches).
Chain 15 between the octagon and flower.
Attach flower with slip stitches beginning in the 3rd dc on one petal, taking 4 slip stitches, chain 2 between petals, 4 slip stitches to attach adjacent petal.
Chain 10 between flower and square.
Attach square with slip stitches across one side (18 stitches).
Chain 10 between square and octagon.
Attach octagon as described above. This is your centre piece.
To attach the rest of your shapes, repeat the above but in the opposite order, using the described number of chains between the various shapes – middle octagon, chain 10 to square, chain 10 to flower, chain 15 to octagon, chain 10 to triangle.
Create 60 more chains, plus 6 extras to form a loop. Cut yarn and pull end through.
Using yarn tails at either end, form loops by stitching into 6th chain from either end. Weave in ends.