My friend Leslie needed a head-shot for her business website, so she and I met on a recent afternoon to take pictures.
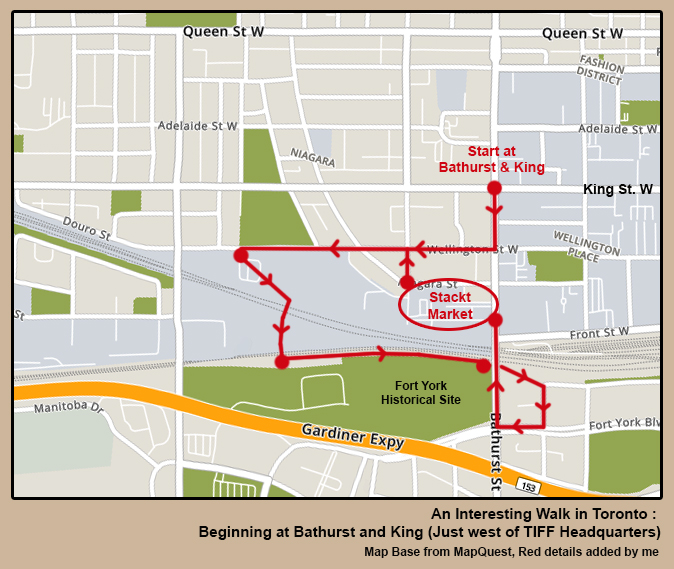
I knew that we’d find some great backgrounds, plus have an interesting walk together on that beautiful autumn day in Toronto’s King Street West neighbourhood, so we met at Bathurst and King. From there we headed east, into the back alley and behind the buildings on the north side, then going south on Portland to the park. We walked westward along the north side of the park, along Wellington, back to Bathurst. We turned north there and walked back up to Bathurst and King.
The whole thing took about an hour and a half and included 13 different stops to shoot. In all, I took 250 pictures (including some of the buildings and scenery) and ended up with six choices that would work for her needs, plus a whole bunch of other pictures, just for fun.
So, today I thought I’d share some of the photographs and ten tips for taking portraits. I used a Canon Rebel DSLR with a 18-55mm lens, however decent pictures of people can be taken with any form of camera.
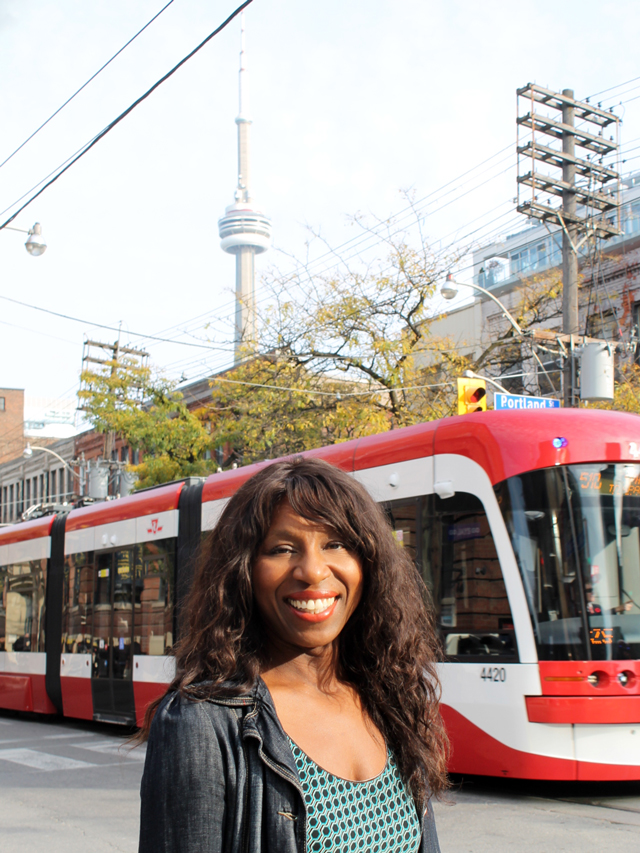
Here is the one she chose to use and a runner-up …


Before we get to the tips, here are a few more pictures from the day …


My Ten Photography Tips for Taking Portraits :
1) Lighting – You’re aiming for smooth even lighting, without dark shadows.
– Outdoor, natural daylight is the best light, no doubt. If you have a choice, aim for when the sun isn’t directly overhead, so early morning or late afternoon. A sunny day or a little cloud cover is ok, but try to avoid really overcast days if you can.
– Having the person in complete shade works out the best as you’ll have fewer harsh dark shadows and less likelihood that your subject will squint or frown. If possible you and the camera should also be in shade, in order to avoid confusing the camera’s light sensor. Avoid mottled shade from trees, where little dots of light can come through and ruin your shot.
– Try to have the person facing where the sun is coming from (although, since they’ll be in the shade, the sun won’t be shining on them), or at a 45 degree angle to where the sun is. Avoid having their back facing the sun, as this will cause them to be too dark against a bright background.
– Note that the brighter the ambient light, the more in-focus the pictures will be. That’s because the shutter doesn’t have to stay open as long when the light is better and therefore gives you and your subject less time to move/shake while the shutter is open. Also, if you take a breath and hold it just before you push the button, you’ll shake less and get a clearer photo.

↑ Out-take : Some nice flowers in the background and the lady is gorgeous, but the bright (unshaded) light on her face caused undesirable shadows. ↑
2) Subject – Look at the person carefully before beginning to shoot. Is there something wonky going on with their hair, or does their jacket look better buttoned up? Should they put on a bit more lipstick or some lip balm?
If possible, have them dress in something with some colour and without stripes, although this would depend on the subject, of course.
Look at their eyes — can you see a bright spot of light reflecting in them? You want that, as without that light spot, eyes in photographs lack luster and life.
3) Setting – Plain backgrounds often work best, as too much going on behind the person will detract from the subject. Make sure there isn’t something like a trash can behind the person.
Rather than asking them to move around in order to get the best background, you can move and/or angle the camera so you don’t see the bad stuff. Note, you can often move the camera so the person is hiding something unsightly behind them. Also, make sure they don’t have something behind them that appears like it’s growing out of their head in the picture.
If the person is against a wall, have them move slightly away from the wall, so the camera doesn’t focus on the background rather than them. Technically, this relates to depth-of-field and aperture, however in most situations you don’t have to mess with those settings if you just have your subject take a step away from a wall.
↑ An out-take because of the direct light on her face, but also because the background is a bit busy. Also, since this was a quick unplanned snap, her eyes are not completely open. However, although this picture didn’t satisfy the needs of the project, I still like it as it makes a fun souvenir of the outing! ↑

↑ Out-take : We hoped to get one with a cityscape in the background but couldn’t find a spot without cars which I find are usually unattractive in pictures. Also, we couldn’t find a spot where the sun wouldn’t be directly on her face. ↑

↑ Demonstrating how moving away from a background will generally cause the camera to focus on the subject and not the wall. See how the bricks are a bit blurred while her face is in focus? ↑
4) Posing – Most people look better if they’re turned slightly, rather than completely face on. Ask the person to turn their body a bit and then turn their head to face the camera. If it looks natural, have the person stand so one leg crosses in front of the other, a pose that will make them appear slimmer.
Make sure the person’s hands are not clasped behind their back – that rarely looks good because their stomach/waist ends up looking more prominent.
Have the person look at the lens of the camera, rather than giving them the “looking off yonder” look, unless that’s the look that you’re aiming for, of course.
5) Aiming – Try to aim the camera level to their face or slightly above, looking down at their face — only slightly though, as you don’t want big huge eyes and a tiny chin (well, unless you’re going for that.) Sometimes, having the camera aiming slightly up works, but most often you don’t want to see underneath the person’s chin at all.
If you’re shorter than the person, hold the camera up to take the shot — it doesn’t matter if you’re looking through the viewfinder/screen when taking the picture. Just quickly check the shots after you’ve taken them to make sure you weren’t holding the camera too crooked or cutting anything off because you couldn’t see what you were doing when you took the picture.

↑ A shot that was taken from too low. I was standing on the ground while she was up on a platform. I did hold the camera up but wasn’t tall enough so it’s taken from slightly below, an angle that usually isn’t overly flattering. The shot is still cute though … just didn’t meet the purpose. ↑
6) Make the person feel comfortable – It goes without saying that you’ll have a better photograph if the subject within looks happy and at ease. Do this by smiling at them from behind the camera. Often they’ll smile back, and people generally look nicer if they’re smiling. However, sometimes a non-smiling picture will be better depending on your subject. Regardless, they should look loose and comfortable. If they look like they’re feeling stiff, give them a moment to shake it out and then get back into position.
If you have a lens or function on your camera that allows you to get a closer image without moving, use that, so the person doesn’t feel like you’re getting too close physically.
7) Quantity – Take lots of shots! With today’s digital cameras, it’s not like you’ll be running out of film so you can afford to take plenty of pictures in order to have lots to choose from and therefore get the best one(s). My habit is to take at least three shots of every pose.
Take some shots closer up, focusing on their torso and head, and some from further away, keeping in mind that rarely does a shot that’s taken from too far away serve any purpose where portraiture is concerned, because you can’t see the person well.
Try taking some black and white shots in addition to colour, either by changing the setting on your camera or using a post-production program such as PhotoShot or Picmonkey.
8) Choices – Choose several different backgrounds if you have the time. I’ve had situations where I thought I’d chosen the right spot to take the picture but later discovered that a different location would have been better, so move around, keeping the lighting points above in mind. Have the person face north, east, south and west, trying different light angles.

↑ This is a lovely photo that was taken in the park, however, with the tree bark texture in there, it might not be suitable for what is required, demonstrating why it’s good to pick a variety of locations/backgrounds. ↑
9) Cropping – Crop your shots, depending on what the pictures will be used for, either as you take the picture, or using the cropping tool in the camara or post-production. If the person needs a head-shot, crop it so you have their head and shoulders centred, with eyes roughly positioned 1/3 of the way down from the top of the picture. Make sure to leave some space around the subject so they don’t end up looking like their jammed in there.
If it’s not a head-shot try different cropping, avoiding cutting your subject directly on any joints (ankles, knees, wrists, elbows). Also, crop to cut out anything in the background that you don’t want in there.
Note that the more tightly cropped a photo is the more it will be out of focus — that’s because you’re “stretching out” the number of pixels to make a photograph of the same size. The quality of your camera effects how much you can crop — for example you usually can’t crop a cellphone photo much before it gets a little blurry, but even with my DSLR, there is just so much you can crop before losing focus. This only really matters if you want the picture to look good on a large screen though, as you wouldn’t be able to detect blurriness on a small screen or if the picture is displayed in a small format, as is the case with most profile pictures, for example.

↑ She looks great here but a tighter crop was more suitable for her requirement of a head-shot. ↑

↑ A cropped version of the shot above. It is slightly out of focus, demonstrating how you usually can’t crop too much before blurriness sets in. ↑

↑ Not the exact same shot but an example of how cropping, more or less, will completely change as image. ↑
10) Editing – Other post-production editing : Once you and your subject have decided on the best pictures of the lot, you might choose to do a bit of editing, with a program like Photoshop or Picmonkey, or by adding a flattering filter from a camera app. It’s not that you want the person to look better, younger or thinner than they are in real life, but rather that you want them to love the pictures you’ve taken of them without them really noticing that you did anything to them. My rule of thumb is to try to make the person look exactly like themselves, but as though they’d had a great night’s sleep before the session, and that the pictures were taken in perfect lighting (because no matter how much you try to stick to the lighting guidelines above, lighting is always the toughest thing to get right.) I also tend to use some sort of a blemish tool if needed. Even babies and young children sometimes need a bit of editing. For example, you might want to clean a crumb of food on someone’s chin. You can even pick up trash you hadn’t noticed before, with an editing tool. Sometimes I play with the colours to make them brighter.
Post-production editing is a huge subject that takes a lot of practice to get right, so while I suggest some tiny edits, you do want to stick with the premise that “less is more”, as the most important thing is to get a good representation of your subject, that looks just like them. All in all, you always want to get the best picture you can right out the camera!
I hope these tips come in handy next time you find yourself with a camera in your hand and a person to photograph!
Thanks for reading,
xo loulou