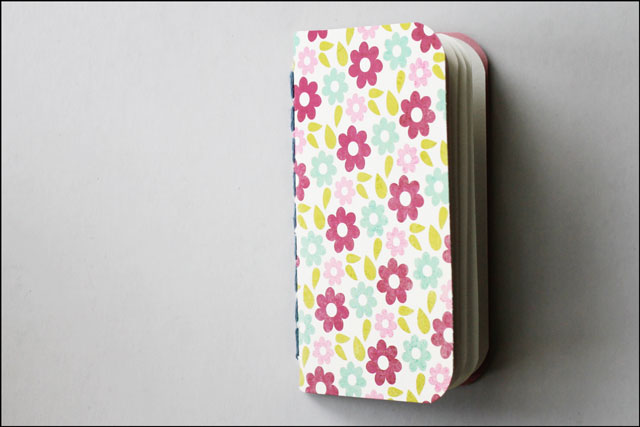
I recently made this purse-sized notebook for my on-line friend Shakti. As I had never made one before it was one of those things that you just dive into doing, not really being certain how it will turn out. I have to say that I like it and am now interested in doing more book-binding.
One thing I did know before I started was that I wanted to personalize the book. Having grown up with a sister with a unique name, who always had so much difficulty finding anything personalized, I thought this touch would be nice for my one-of-a-kind friend!
The supplies I used included: A pre-made patterned card for the cover, Some good paper for the pages, Embroidery thread and a needle to bind it with (though I’ve since discovered that there is some special book-binding cord made specifically for the purpose, but I like how the embroidery thread turned out too.), Painters paper tape to reinforce the cover along the binding (Washi tape would also work), Some adhesive letters, Some packing tape, and some coloured card stock.
Follow Up : I made more of these notebooks with step-by-step photographs of the Coptic Stitch that I used for the binding. See it here.


I began by cutting the paper for the pages. I decided to go with six folded pieces, which would result in a 12 page booklet. I trimmed the paper about 1/4 inch smaller than the cover so it wouldn’t stick out when I was finished. I did this by folding all the pages together (as they will be folded in the final book) and noticed that the inside pieces had to be trimmed more than the outside ones. I used a sharp exacto-knife to cut through all the paper at once (it took a few passes of the knife).
After reinforcing the fold of the cover, on the front and the back, with the paper-tape, I then used a thumb-tack and a hammer to punch holes along the spine of the paper and the cover, one centimeter or about 1/2 inch apart. To make sure they all line up exactly, punch all the pages and the cover together. They make awls especially for such a task, so you can use that instead of a thumb-tack, though it worked quite well!
The binding stitch I used is called a Coptic stitch. This is an ancient method of book-binding, and can be used to make thicker books too, but I was just making a smaller booklet, so simplified the process. Now, I hope I can explain this well … From the inside of the cover pass your thread through the first hole, leaving a tail of about 4 inches (so you can tie a knot when you’re done). Lining the cover up with the folded pages, pass your thread through the last hole in all thicknesses. This will result in the thread going up the outside spine of the book. Let’s call that the ‘long-thread’ so you’ll know what I mean in the next step. What you will be doing is passing the thread through each hole in-turn, from the inside-out, and then passing it over the ‘long-thread’ and going back through the same hole, from the outside-in. Basically, you’re catching the ‘long-thread’ in a loop and then going back through the hole, and then moving on and doing the same thing in the next hole. Do this in every hole down the spine. When you’re done, pass the thread back to the point where you left your tail in the first step, and tie a good knot. Trim the ends.
In case this is not clear, there are many tutorials on-line for this method of bookbinding.

To make the name-plate, I used two pieces of card-stock in complimentary colours, one slightly smaller than the other. On the smaller one I spelled out the name with letter stickers. But I was concerned that the letters wouldn’t stay stuck down and I wanted the notebook to be sturdy enough to carry in Shakti’s bag, so I ‘laminated’ the name-plate using transparent packing tape. It’s the first time I’ve tried such a thing and was quite pleased with the results!
To complete the notebook I stuck the name-plate on with strong two-sided tape and then to further dress it up, applied a flower sticker.


Now that I’ve made one notebook I am keen to make more. In fact I’ve just bought a special punch to make nice rounded corners! I hope you give this a try.
xo loulou