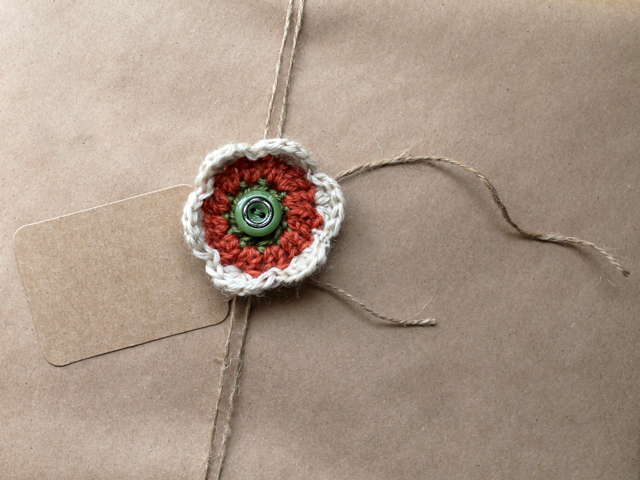
Gift Wrapping : How to Make a Crocheted Flower and Button Topper

Hey hi! Here’s an idea for the crocheters out there, who would like to add a handmade touch to their holiday packages.
These small three-row flowers are easy and quick to make and are a good project for beginners.
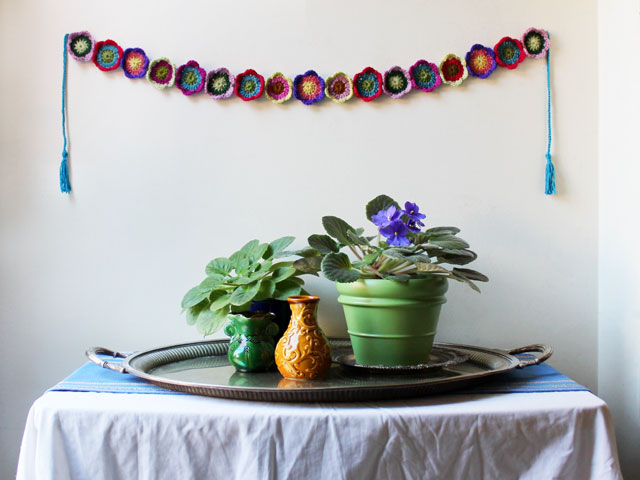
Here I’ve turned the flowers into gift topper decorations by adding a button to the centre, but I previously used the same pattern to make a garland, seen in this post, which is hanging in our living room.

To make these flowers, I’ve used up some vintage wool meant for tapestry stitching that I was given by a friend who was helping out an elderly neighbour get her stash to someone who would use it and love it. And loved it, I have, using it to make all kinds of small things over the past few years. Now, I’m down to the last short lengths, which was perfect for these little flowers. I tell you this, to explain why I’ve used so many different colours to make these. Of course, you should go ahead and use what you have in your collection of leftover shortish pieces of yarn.
For reference, my yarn was Fine weight wool and hook a 3.5 mm, resulting in flowers that are approximately 2 1/2 inches across. Heavier yarn and a bigger hook will yield larger flowers, which actually might be better if you have larger packages to wrap.
As for the buttons, I’ve used some that I got in bags of buttons at Dollarama. In their crafting section, they sell bags of random buttons that are leftover from garment manufacturing. I really like that this is a way for them to made use of plastic that would otherwise go to landfill, and that crafters get an interesting assortment of unique buttons as a result.

Since I posted the pattern for these flowers before, I’m just going to cut and paste it here again. Note: The flowers in the photos accompanying the instructions were one I previously made for the garland …
How to make it :

For each flower:
Ch 4 and connect to form a ring.
First round: Chain 2 and make 11 double-crochet (dc) stitches into the ring. Slip stitch to top of beginning chain 2, to complete the round.
Cut yarn and attach new colour.

Second round: Chain 2, 1 dc into next the space at the base of the chain. Then 2 dc into next 11 stitches. 24 total. Slip stitch to top of beginning chain 2, to complete the round.
Cut yarn and attach new colour.

Third round: Each petal is a “scallop”. Note – don’t “Chain 2” to begin this time. To make first petal, make 5 dcs into 3rd stitch from hook. Skip next stitch and slip stitch into next one (which is 2 stitches away from where you made 5 dc). You’ve formed your first “scallop” or petal.
Repeat 5 more times, to end up with 6 petals.
Cut yarn and weave in all ends.

↑ The flowers will naturally have a slight cup-shape. ↑
So, the previous four photos were of the flowers I made a hole back, when I was making a garland of them. Now, back to the recently made ones, specifically to use as gift toppers …


↑ To turn the flowers into Gift Toppers, cut rounds of thin cardboard into circles, and use those as backings (mine are cut from an empty tissue box. No measurements or accuracy required as these will be on the back of the flower). Sew them right on when you attache the bottoms. If desired, punch a couple of holes in the cardboard before attaching, to give you a way to attach the flowers to ribbon, and then to your gifts. Or, you can just attach the flowers by putting a piece of two-sided tape on the cardboard and sticking the flower to your gift.


In addition to these flowers making use of leftover yarn, “saved-from-landfill” buttons and salvaged cardboard, they go one step further toward green gift wrapping since, I bet, every petite flower topper you give to someone, will be saved and passed on to someone else. And so on.
Thank you for reading! Wishing you a great weekend,
xo loulou
These stories were linked to.
Related Subjects
crochetinggift-wrappingmaking-things Week 36 Creative Challenge : A Crochet Doily in a Seasonal Colour
 Week 34 Creative Challenge : A Crocheted Mouse with an Outfit
 Week 32 Creative Challenge : Bitten by the Miniature Bug!
 Week 31 Creative Challenge : Vintage Barbie Dolls Get Dressed
 Week 29 Creative Challenge : Crocheting Doilies with a Specific Purpos...