For the Crocheters and Admirers of Colour : A Petite Flower Garland

Hello! Here’s the pattern for a small flower garland I made for spring and summer decoration.
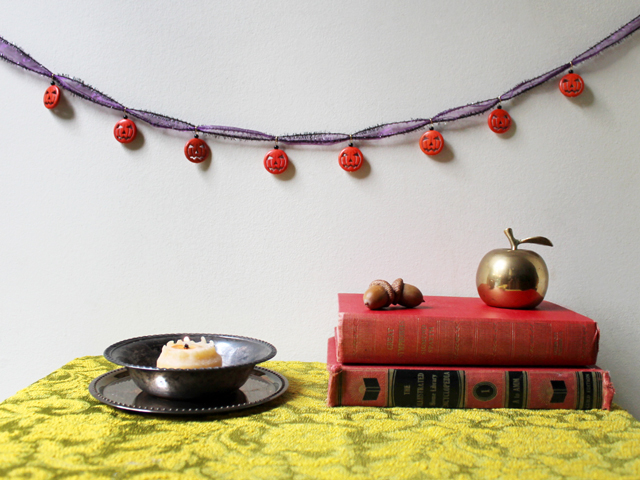
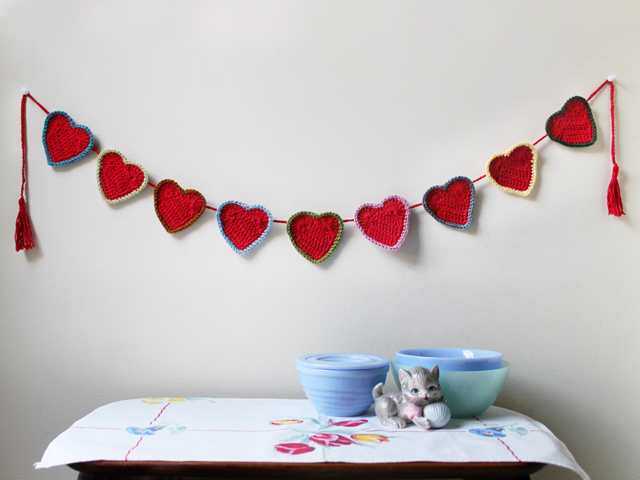
We have this odd pillar in our living room (that hides pipes and cables going upstairs) which I decorated with this garland made with jack-o-lantern beads last Halloween. Then at Christmas I hung a string of small baubles there. And at Valentine’s I put the heart garland I crocheted last year (seen in this post). Once that came down, the space looked empty so I crocheted another garland to put there, this one made from small multi coloured flowers.
Based on the number of garlands I’ve made and shared on these pages, it’s clear that I like them. There’s something so cheerful about them that appeals!

This is a relatively petite/short garland that would be good to hang across the top of a door frame, or on a small wall.
The flowers are quite simple to make, each having only three rounds. Any yarn/hook size can be used, although, of course, what you use will result in different dimensions. Also, the number of flowers you include is up to you, so you can make it as long as you want, keeping in mind that each flower is only about 2 1/2 inches in diameter so if you make it quite long, you’ll end up with a long thin garland.
For reference, I used a Fine weight yarn and a 3.5 mm hook. The completed piece is about 60 inches wide. There are 17 flowers, each being about 2 1/2 inches wide (narrower when attached and squeezed together), with two end pieces of 12 inches each, including the tassels.
If you have shortish pieces of yarn in various colours leftover from other projects, this would be a perfect way to use them up. I used part of a large stash of yarn I’d been generously given by a friend who was sorting the estate of an elderly former crafter — it is vintage wool that came in small skeins meant for making needlepoint tapestries, which is why I had so many different colours. (There’s a photo here, if you’d like to see.) I’ve seen mini skeins of wool at yarn shops though, so if you don’t already have leftovers to use, you could get an assortment of those to make this garland. Or, pick up regular skeins and make all of your flowers in the same combination of three colours.
Since I only had short lengths of yarn to work with, I selected something else (which I had more of) for the ends, tassels and length onto which each flower is threaded. I used a cotton yarn that was a bit heavier than the wool I made the flowers with, in a co-ordinating colour, but you use whatever you have. If you’re making all your flowers the same, I suggest you use the colour that you used for the the centers of the flowers to make the end pieces and tassels.

How to make it :

For each flower:
Ch 4 and connect to form a ring.
First round: Chain 2 and make 11 double-crochet (dc) stitches into the ring. Slip stitch to top of beginning chain 2, to complete the round. Slip stitch (chain) again and tighten. Cut yarn and pull end out (so it won’t unravel).
Attach new colour.

Second round: Chain 2, 1 dc into next the space at the base of the chain. Then 2 dc into next 11 stitches. 24 total. Slip stitch to top of beginning chain 2, to complete the round. Slip stitch (chain) again and tighten. Cut yarn and pull end out (so it won’t unravel).
Attach new colour.


Third round: Each petal is a “scallop”. Note – don’t “Chain 2” to begin this time. To make first petal, make 5 dcs into 3rd stitch from hook (so there’s one empty stitch between the stitch your hook is in and where you’re making the 5 dcs). Skip next stitch and slip stitch into next one (which is 2 stitches away from where you made 5 dc). You’ve formed your first “scallop” or petal.
Repeat 5 more times, to end up with 6 petals.
Slip stitch and cut yarn. Weave in all ends.


↑ The flowers will naturally have a slight cup-shape. ↑
For ends and tassels:
Leaving about 4 inches, make a slip-loop to begin a chained length. My end pieces are each about 12 inches long, made from 50 chains and 3 inch tassels. Leave a long tail (we’ll call that the “tail-end”) — you’ll be using that to hand stitch your flowers together. So, each tail-end should be long enough to extend to the middle of your length of flowers, with a few inches to spare. Pull the long tail through the last chain, to secure it (and stop it from unraveling when pulled). Make both tail-ends exactly the same length.

At the beginning of each chain piece (where you have the 4 inch extra), create a tassel as described in the instructions in this post.


Completing your garland:
Thread the long tail-end of one end piece onto a darning needle. Attach the flowers by stitching them on using a running stitch through the first and second rounds (leaving the petals free), being careful to only sew through the very back of each flower, so the stitches don’t show from the front. You want your stitching to be across the top third of each flower, so they will hang nicely (see photo to see what I mean). Do this by beginning to stitch each flower at the centre of the base of a scallop, going across and coming out at the centre of the base of the third scallop over (that’s hard to explain, so please see the photos!).


Stitch half your flowers on once end-piece, going half way on your last one (if you have an odd number of flowers, make the odd one your centre flower and go halfway along that one. Remove your needle, leaving the end dangling.
For the second side, thread the long-tail on the needle and do the same thing with other half of your flowers, BUT, stitching across the bottom third of each flower instead of the top third. This will result in all the flowers hanging the same, when the two tails meet in the middle of your garland. “Meet” the first tail-end in the centre of the middle flower.
Adjust your flowers by sliding them along the “stitching yarn”. Squeeze them together a bit, to hide the “stitching yarn” and to allow the natural cup-shape of the flowers to show.


Since each tail-end is exactly the same length, you’ll easily be able to ensure that the flowers are equally spaced from the centre. Once you’re sure you like the spacing of the flowers, tie a knot in the centre. Check your spacing again, and if you’re happy, go ahead and clip off any extra length of tail-end. Weave in the ends.


Here are a couple of shots of how this garland looks in our home in real life …


Thanks for reading. If you are a crocheter, I hope you’ll make one to decorate your space!
xo loulou
These stories were linked to.
Related Subjects
crochetingmaking-things Week 36 Creative Challenge : A Crochet Doily in a Seasonal Colour
 Week 34 Creative Challenge : A Crocheted Mouse with an Outfit
 Week 32 Creative Challenge : Bitten by the Miniature Bug!
 Week 31 Creative Challenge : Vintage Barbie Dolls Get Dressed
 Week 29 Creative Challenge : Crocheting Doilies with a Specific Purpos...