Hi. The maker-of-things in me has been dialed up lately and I can’t seem to sit still and watch a movie or listen to a book without a sewing needle or crochet hook in hand. So, here is a multi diy tutorial post, demonstrating three things you might like to make, to decorate for St. Patrick’s Day coming up next week. Well, one is St. Patrick’s specific and the other two can be made to suit any time of year.
If you, too, are itching to create, perhaps you’d like to have a go at these.


We’ll start with the St. Patrick’s Day specific item, a felt shamrock/clover, that is stuffed to give it dimension :
Supplies :
- Green felt
- Green thread or embroidery floss,
- a bit of stuffing (cotton balls would work)
- paper, scissors, pins and a needle
- a short piece of pipe cleaner or wire, to give the stem more strength
- Optional, for decoration : a short piece of ribbon and a button

How to Make it :
Cut a paper pattern heart that is slightly taller than it is wide. (If you need help making a perfect heart shape, there are some photos in this post that will help). Mine is 2 inches tall and 1 3/4 inches wide.
Also, cut a paper stem pattern that is 1 1/2 times as tall as your heart shape. Mine is 3 inches tall x about 1/2 an inch wide. I curved mine a bit but that’s not necessary if you don’t want to.
Pin the heart pattern to your felt and cut around it. Since felt sticks to itself quite well, you can cut out one heart with the pattern and then use that piece as a pattern for the rest, bypassing the need to re-pin your paper pattern for every one. Cut out 6 hearts and two stem pieces.


Cut a piece of pipe cleaner to about a 1/4 inch shorter than your stem piece. Mine was 2 about 2 3/4 inches.
Thread your sewing needle and tie a knot, leaving a tail of about 3 inches (which will make it easier to hide within the piece at the end).
Beginning at the bottom point of the heart, stitch 2 of them together with a running stitch about 1/8 inch from the edge, around the perimeter, leaving a space to add your stuffing, before stitching it shut. You’ll see that does take much stuffing at all. If desired, do a few running stitches up the middle of the heart. Knot and leave thread ends a few inches long.

Line the two pieces for the stem together and stitch along one side and the bottom of the stem. Put your piece of pipe cleaner in and stitch up the other side.
The fluff on the pipe cleaner acts as the stuffing for the stem, plus adds some strength to it for when you stitch on the petals.
If using plain wire, add a bit of stuffing alongside, to puff out the stem piece a bit.

From the back, stitch the petals onto the stem, beginning with the two side ones, positioned about 1 inch down from the top of the stem. Make sure your stitches go over the wire, to secure them, instead of just going through the felt part. Stitch on the third petal, again, including the wine within the stitches.

To hide all the ends of the threads within the stuffed pieces : thread them onto the needle (separately) so they’re just folded over (that’s hard to explain, see the photo of the beaded piece below, to see what I mean). At the base of the thread (where the knots are) put your needle through the stuffed piece, passing it right through the piece. Pull the needle off the threads and trim any excess. The end of the thread will be hidden within the stuffed piece.

If desired, make a ribbon and button decoration by looping the ribbon. Create a lasso with some thread and secure the centre of the loop. Use the thread to sew on the button and then stitch the decoration onto the felt shamrock.


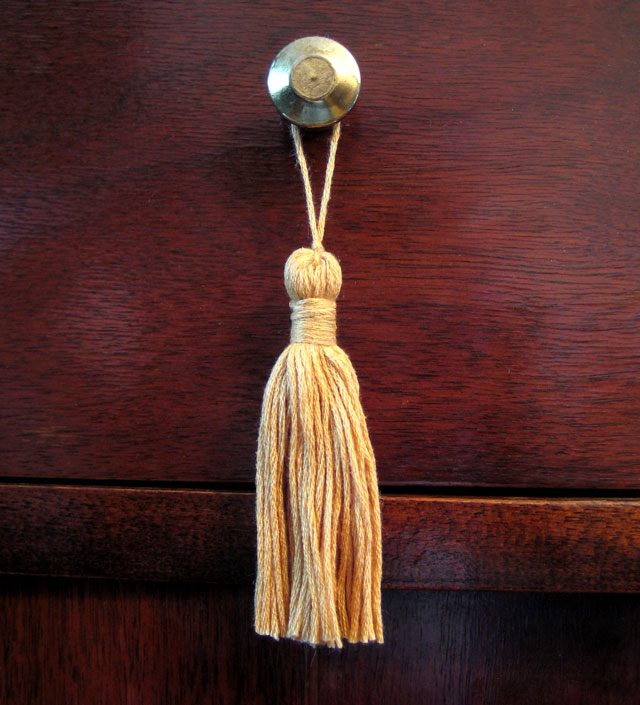
The second thing to make is quite simple, requiring some wooden beads with a fairly large hole, and a store-bought tassel on a cord (or you can make your own, either this way, or this way). A piece of wire is used as a needle to thread the beads onto the corded tassel.

I repurposed some beads from a Christmas garland I found at the thrift store (discussed in this post, if you’re into thrifting stories). These tasseled bead strings only used up a small part of the garland, so it’s still usable as originally intended, only a little bit shorter. But, if you don’t have a beaded garland to use, Michael’s sells bags of wooden beads that would work for this. You can leave them in their natural wooden state, or paint them. If you decide to paint them, do that before threading them onto the tassels. Tip: thread them onto a scrap wooden skewer to make painting them easier, since they won’t roll around on you.


The beads are secure (as long as you don’t pull really hard) thanks to the double thickness of the cord folded over, so make sure several beads cover the double thickness part. Or, if desired, you can tie a know in the cord, but I think it would be quite difficult to hide the knot. Or, you can add some glue, but honestly, these are staying together just fine with that added step.

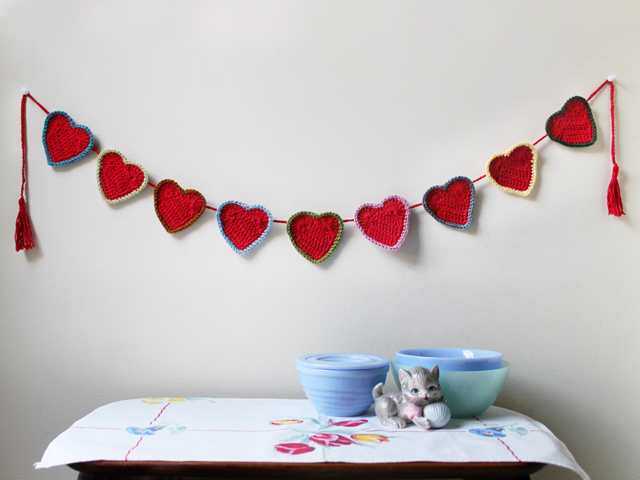
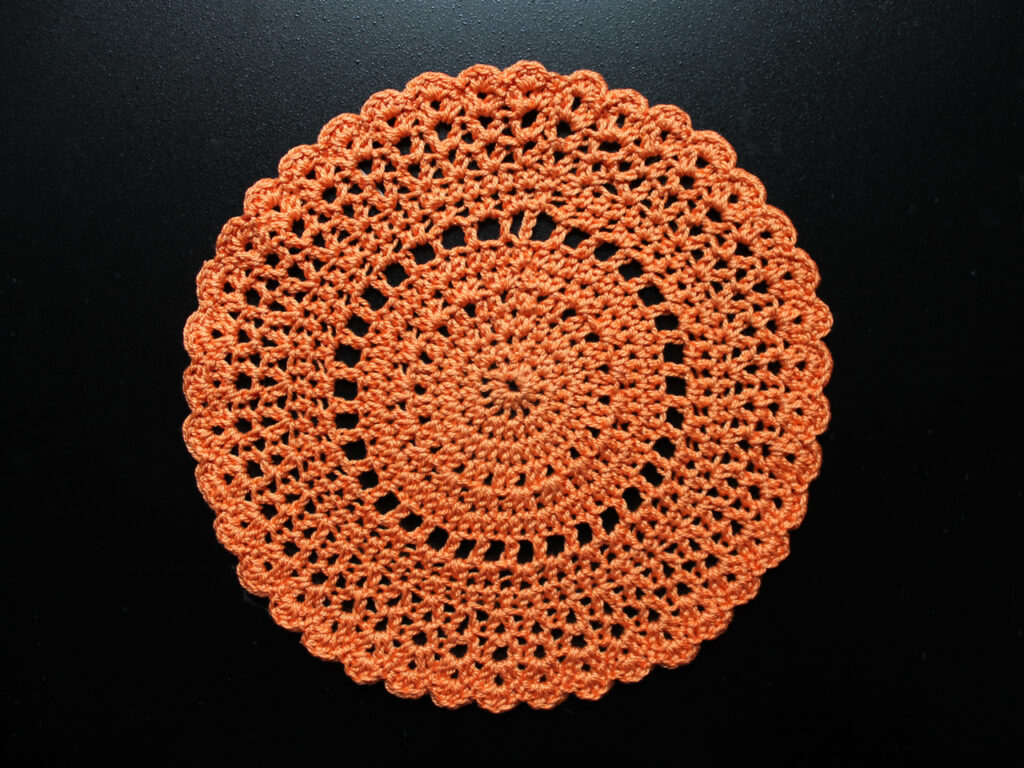
The third item is for the fellow crocheters out there. I followed this free pattern. It says it’s an easy pattern but, I’d say it’s more aimed towards experienced crocheters. In other words, I and the commenters on that site found it a bit challenging in places. If you have any questions about how to work it, please send them to my email and I’ll try to help.
I used regular yarn that I had on hand, but it’s more meant for cotton thread. I plan to make another one using just that, which will inevitably result in a much smaller finished piece. All in all, it’s a fun thing to make once you figure out what’s going on.


There’s another handmade item in these photos — that’s the “Cross-stitch on Paper” Shamrock. The method for making that is outlined in this post.
Speaking of St. Patrick’s Day, this year’s Annual Parad will be the first public event to happen in Toronto since the beginning of the pandemic. It was the first major event cancelled two years ago and the first to come back. We have a large Irish community here, and based on what I’ve seen and heard, people are quite excited for this. It takes place on Sunday, March 20th.
Thank you for checking out my post, and if you celebrate, Happy St. Patrick’s Day to you.
xo loulou